
Power on/off cluster
This should be used as a TEMPLATE GUIDE per HPC. Each HPC system can have variations that will change the order.
Power Off
Check status
Verify the status of the compute nodes and note which nodes are up/down.
$ cv-power -g nodes status -g nodes refers to a node group created containing all compute nodes. If you do not have this group, are unsure if you do, or want to see a listing of available groups, run cv-nodenames -a --dump-groups to get a full listing of all nodes and devices and their associated groups.
Turn off compute nodes
Power off all nodes. This example is using the “group” directive. To find a list of groups and nodes, run cv-nodenames -a --dump-groups .
cv-power -g nodes shutdownTurn off non-node, non-storage nodes
Typically, anything non-compute or non-storage node will be login nodes or, in some cases, the head node when the head node has no NFS storage mounts.
NOTE: Don’t do this if you are currently logged into this node… In the case where there is one login node that all other commands are run from, it should be the last node.
NOTE: Any system that uses dual-mirrored drives should be properly shut down with the ‘poweroff’ command. Other methods (eg: cv-power or init 0) may not properly unmount the MDADM RAID which can cause boot issues.
cv-power -n login01 shutdownTurn off storage nodes
Lastly, turn off the storage nodes. In some clusters, this is the head node. In some, this is storage01, in others, there are multiple storage nodes. This example is using the “group” directive. To find a list of groups and nodes, run cv-nodenames -a --dump-groups .
NOTE: Any system that uses dual-mirrored drives should be properly shut down with the ‘poweroff’ command. Other methods (eg: cv-power or init 0) may not properly unmount the MDADM RAID which can cause boot issues.
cv-power -g storage shutdownTurn off the appliance
This must be done by logging into the appliance and running:
cv-power -A -n cv01 shutdownor by manually pressing the power button.
Power on
To power everything back on, reverse the order:
Start the appliance
Push the button on the appliance - wait until it has booted.
Start the storage
This may be dedicated storage nodes, or the head node.
Push the button on the storage node(s) or run:
cv-power -g storage onWait until it has booted, then login to storage node(s) the and take a look that it's happy and there are no obvious errors. Verify that the storage mounts are working
df -hFor ZFS
zpool statusFor beegfs
beegfs-check-servers
Start the head and/or login nodes
Push the button on the head node and wait until it has booted. Log in and take a look that it's happy and there are no obvious errors. Then do the same on the login node(s).
Start the nodes
cv-power -g nodes on That should power on all the nodes. But if any are having issues, you may just need to hit the power button on them all.
How to configure power on/off options
Each node can be configured to use one of these three methods.
Default
Ensure that the default method is selected.
Web GUI
Nodes and Devices → Nodes → Select the node to be edited → Edit → General → Default Power On/Off Method

CLI
$ cv-conf -e node.node_name
power_method: ipmi
SSH
This method requires the node to be online and the Linux operating system to be working. SSH keys must be working.
Web GUI
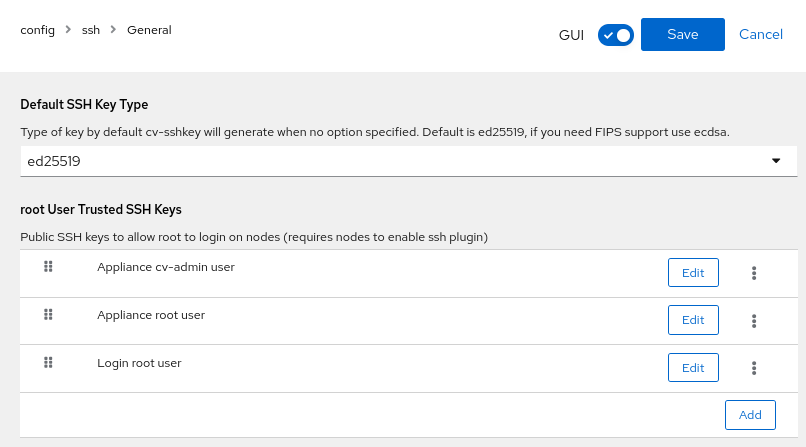
Users, Groups, and Roles → root User Trusted SSH Keys: Ensure the appliance, root, and any administrators have their keys listed.
CLI
$ cv-conf -e config.ssh
<edit>
trusted_root_ssh_keys:
- label: Trusted Admin user name here
  public_key: ssh-ed25519 AAAAC3N...long_string_here...ASD
    user@host.cluster
IPMI
This method requires a working IPMI/BMC network that has been properly configured.
Web GUI
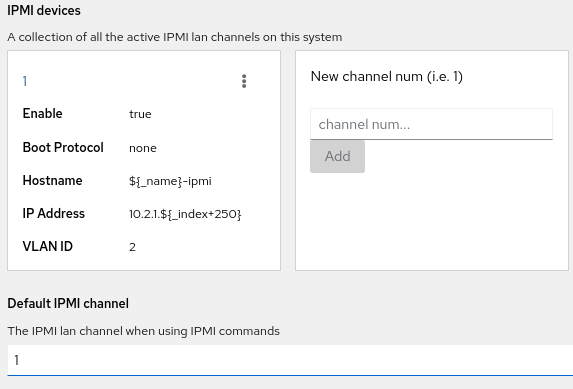
Nodes and Devices → Nodes → Select the node to be edited → Edit → Networking → IPMI devices
CLI
$ cv-conf -e node.node_name
<edit>
ipmi:
  '1':
    bootproto: none
    cipher_suite: '17'
    enable: true
    gateway: 10.2.1.240
    hostname: ${_name}-ipmi
    hwaddr:node01: de:ad:be:ef:01:ab
    ipaddress: 10.2.1.${_index}
    ipmi_manageuser: true
    ipmi_password: S0m3P@55
    ipmi_userid: '5'
    ipmi_username: clustervisor
    netmask: 255.255.255.0
    switch_port: {}
    vlan: '2'
PDU
This requires a managed PDU (not just metered, but managed!) and that it has been configured.
Web GUI
Both the node and the PDU must be configured.
Node
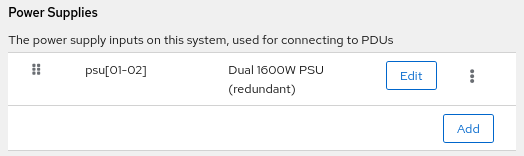
Nodes and Devices → Nodes → Select the node to be edited → Edit → General → Power Supplies → Each PSU must be listed.
PDU
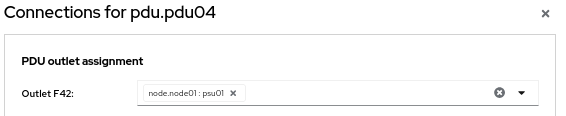
Rack Layout → Edit Layout / Connections → Edit Mode → Connections → Click on the PDU to be edited → Select the node PSU on the correct outlet.
CLI
Both the node and the PDU must be configured.
Node
$ cv-conf -e node.node_name
<edit>
powersupplies:
- description: Redundant 1200W 80+ Titanium PSU
  name: psu[01-02]
PDU
Export, edit, then import.
Individual node
$ cv-connections --dump node.node01 > node01.out
$ vim node01.out
[powersupplies]
psu01 = "pdu.pdu03:A1"
psu02 = "pdu.pdu04:A1"

$ cv-connections -i node.node01 -I node01.out
Entire PDU
$ cv-connections --dump pdu.pdu01 > pdu01.out
$ vim pdu01.out
<edit>
[outlets]
F42 = "node.node01:psu01"
$ cv-connections -i pdu.pdu01 -I pdu01.out