
Setting Nodes to Inactive Status
Overview
By default, all nodes, devices, switches, and chassis have a status of Active, in which they are fully operational within ClusterVisor. When nodes are down due to maintenance or failure, certain commands and operation may take longer as they try to reach that node. To eliminate these delays, ClusterVisor has a feature to mark nodes inactive. When a node is inactive, many ClusterVisor operations will skip that node until it is returned to an active state.
There are two categories of inactive nodes: Temporarily Inactive, and Permanently Inactive. While the behavior the admins experience for these two types is similar, it’s important to understand them and choose the right type. The following sections describe these types, and when to use them.
A Temporarily Inactive node is a node that will be down for a limited time, and is expected to be returned to service some time in the future. Here are some examples for reasons a node should be set as Temporarily inactive:
Waiting on a faulty component to be replaced
Maintenance to a power circuit
A switch servicing the node has failed
A Permanently Inactive node is a node that is being permanently removed from service, and will not return to operation in the cluster. The primary reason a node would be marked permanently inactive is if it has suffered a catastrophic failure, is no longer under warranty, and is not going to be repaired.
Behavior
The behavior of Temporarily Inactive and Permanently Inactive status differs, as well.
Devices that are Temporarily Inactive will be listed as such in the output of
cv-...commands. No such warning occurs for Permanently Inactive nodes.
Example:CODEWarning: 'node03' excluded, status is 'Temporarily Inactive'Temporarily Inactive devices are shown with distinction in the ClusterVisor web UI, but Permanently Inactive devices are hidden entirely.
When devices are marked Permanently Inactive, their stats history and alerts are deleted. Temporarily Inactive devices retain their history and alerts for future use.
Devices marked with the temporary status will continue to have configuration changes queued, while nodes that are permanently inactive will not.
Setting the Status
Web UI
In the Web UI, the status for any individual or group of nodes, devices, switches, or chassis can be set by editing that individual object. This setting is in the General section of that object’s configuration window.

Example General section for node.node[083-117], showing Status for the full group, and the options.
By changing the value in the drop-down box, the status will be changed for all devices in that section, e.g. node083 through node117 in the example above. To change the status for just one or a few nodes, variants should be used instead.

To change the variants, click the button labeled “0 variants” opposite the word “Status”.
After clicking on # variants, a new modal window will pop up, again showing the overall status for this section, as well as allowing modification of the variants by adding, deleting, or changing selections. By clicking Add new variant, individual nodes may be selected, and the status set for them.
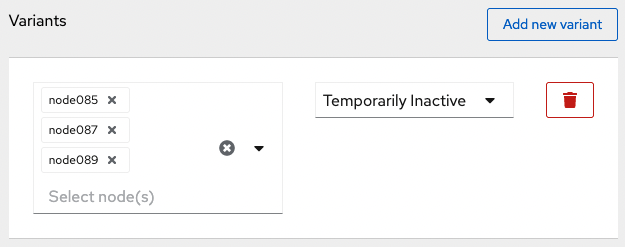
A Status variant for node085, node087, and node089, set to Temporarily Inactive.
Nodes can be removed from the Temporarily Inactive state by editing the variant, then removing the node from the variant. If it is the last node to be removed, or all of the nodes should be set to Active, click the trash can icon.
Once the variants are set, click Save variants at the top of the modal window, then click Save at the top of the window of the section being edited. The wrench icon will indicate that changes need to be committed; click the button and choose Commit changes to nodes for to finish updating the status.
To set nodes back to an active status,
Nodes can be set back to Active status by going to Nodes and Devices → Nodes, edit the node of interest, going to General → Status, editing the Variants, then removing nodes from the Temporarily Inactive status. Don’t forget to Save variants, then Save (node window), then Commit (Tool button → Commit changes to nodes.)
CLI
Statuses can be modified via cv-conf. The most common usage is to use cv-conf -e, and add, remove, or modify the variant of status with an interactive editor. The property to edit is labeled “status”, and has valid string values of Active, Temporarily Inactive, or Permanently Inactive. Variants of status are in the format status:nodespec:, where nodespec can be one or more nodes that should encompass that variant.
For example, the following two lines list the defined Status of the section of nodes (Active), as well as variants for node103, node105, and node107 for a Status of Temporarily Inactive:
status: Active
status:node[103,105,107]: Temporarily Inactive
After making the appropriate changes, save the file and exit the editor, then use cv-commit --commit to commit the changes.